Sunday, December 29, 2013

Winter Feathers

Today I have a look I really love--Winter Feathers. I love the look of stamping over a multichrome polish. It's a new look at every glance and angle!

Winter Feathers--I Love Nail Polish My Little Glacier & Messy Mansion MM14
I started with a ridge-filling basecoat, a must for any chrome-type polishes. I then used three thin coats of My Little Glacier and topped it with HK Girl from Glisten & Glow. Not only does this make your base color nice and dry, it gives you one to two chances to swipe off a botched stamp ;-)


For the stamping I used an image from Messy Mansion MM 14--a.k.a. "the bird plate." I was so excited to finally get my hands on this and some other Messy Mansion plates in a group buy! I used Pure Ice Silver Star for the stamping color.

I have ordered way too many ILNPs lately, but her ultra chromes are just so amazing! Check out the color shift caught with my amateur photography.


Products:
I Love Nail Polish
Glisten & Glow
Messy Mansion

Have you loved your cuticles today?

Saturday, December 28, 2013

Post-Holiday Giveaway!

I am a bad blogger. Was my last post really on the 21st?! Ah well, all I can say is I had a lovely holiday catching up with friends and family. I hope everyone can say the same!

In my absence I've noticed my followers and likes going through the roof--thank you so much, truly! I started this blog to connect with other nailphiles, teach what I know, and of course learn more. I am craving feedback and conversations, don't be shy about interacting ;-)

I did plan on having a 250 likes giveaway, but now I'm around 300 so I'm renaming it the Post-Holiday Giveaway. I don't know about you but after the excitement of the holidays I always need a pick-me-up. And by that I mean new polish.

For this giveaway I am going to have two winners, w00t!

Prize #1--KBShimmer Snow Flaking Way! & Essie Parka Perfect

Prize #2--Orly Matte FX Green Flakie Topcoat & KBShimmer Misfit Hidden Agenda (LE)

The first name I draw will get Prize 1, the second name will get Prize 2.
I will choose the winner on January 2nd at 12am EST (so get your entries in by January 1st at 11:59pm EST)!

a Rafflecopter giveaway

Saturday, December 21, 2013

O, Christmas Tree: Nail Art & Tutorial

Okay, be nice--here is my first tutorial. I whipped this up just to see if I could do it, then it actually turned out alright so I thought I'd post it! I like this nail art because it is quick and easy, but still festive and fun. I've seen these scotch-tape trees around but I had not tried it yet, so I decided to do just one accent nail. I do this for new techniques I want to try so it isn't so overwhelming and I get a result I am really happy with. The last thing I want to do after a long day at work is fight with nail polish, amiright?

First I want to show you my little Christmas Tree. Isn't it cute!


For these nails I used:
Base Color - Liquid Sky Lacquer White Christmas, I used three thin coats for this beautiful silvery white linear holo.
Tree BaseEssie Going Incognito, perfect Christmas emerald green. Seriously you must own this.
Tree GlitterLiquid Sky Lacquer 'Tis The Season, a perfect matte and satin Christmas glitter!
Star Topper - Wet n' Wild Fergie Hollywood Walk of Fame, I let my bottle settle and dumped out half the base. I keep this around for fishing embellishments out of it.

Direct lighting to show off the holo in Liquid Sky Lacquer White Christmas

Click on this image to get a larger visual of the steps, please note I fail as steps 3 and 4 are mixed up...
1.) Paint on your base color for your mani and topcoat (you know I used HK Girl!). For your tree you will need:
--Two pieces scotch tape
--A green creme base for the tree
--A glitter that will fit inside your tree (I avoided the large glitters from Tis The Season)
--A "topper" (you can fish some glitter out of a bottle or use a gleequin, rhinestone, or a stud)
--A scrap piece of paper or foil
--Tweezers to apply topper

2.) Use two piece of tape to create a tall triangle. I placed my tape at the corners of my free edge and had them meet at the top about 1/3 to 1/4 of the way from my cuticle. Tape can be a little too sticky and pull up a fresh base, dab it a few times on your fingers to remedy that. It's not an exact science and if you really want to be on the safe side wear your base for a day.

3-4.) I mixed up steps three and four which I just realized (fml), please forgive me! 
Paint your green creme from the top of your triangle to your free edge in one thick coat, wrap your tip as well. Immediately pull the tape off and stick it to your scrap paper or foil... I'm telling you this step so you don't end up with polished tape and no where safe to set it. Not that that's happened to me a million times... 
In my pictures number 4 shows the first step, number 3 shows what it will look like when you pull the tape off. 

5.) Once your tree is dry, dab on some glitter and push it around to fill the tree in.
6.) Fish for a star (if you are using a shape from a glitter polish) and dab it on a piece of paper. 
7.) Grab the star with your tweezers and place at the top of your tree. 
8.) Time for a nice thick topcoat, I used KBShimmer Clearly On Top.
9.) Enjoy your tree!

Perfectly easy and festive!
I can see doing these in pop colors like pink, green, and white. Or maybe green, blue, and silver! So many possibilities.
What do you think of my first tutorial? I promise I won't rush and mix up my pictures next time haha. Will you be giving this a try?

Selected Products:
Liquid Sky Lacquer

Love your cuticles today!

Tuesday, December 17, 2013

KBShimmer All Elf'd Up

It's practically Christmas! Since I just started my job I wasn't able to take off Christmas Eve, which is a bummer but hopefully I can get out a little early. Christmas Eve is really when my dad's side of the family celebrates Christmas and it is always my most cherished day of the year. I have to work this weekend but I have Thursday and Friday off. I have a list of last-minute things to do and I think I'm on schedule, so that's good!

Today I have All Elf'd Up from KBShimmer. This is my perfect Christmas polish! A white crelly with red, green, and silver hexes and micro bars. I hate bar glitter but I love the microbars, weird.


KBShimmer has a mind-blowing crelly formula you have to try to believe. It is completely loaded with glitter but so spreadable and never gloopy. I layered two coats over a white creme.


You may recognize my little tree from Hex Nail Jewelry. What can I say, their charms add the perfect little something special to any mani, even glittery crellies.


Where to purchases selected products:

Have you loved your cuticles today? Mine look like they needed a little more TLC in these photos haha!

Sunday, December 15, 2013

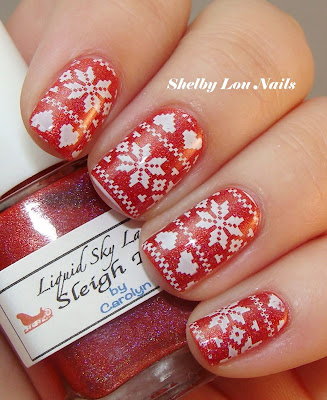
Holo-day Sweater Nails with Liquid Sky Lacquer & Nailz Craze

Hello my lovelies! So I realized today it is practically Christmas and I have not done too many Christmas nails. Must get better at thinking ahead.... Anyway, no matter how overdone they are, I love a good Christmas sweater mani. I have worn these for a few days now and they still make me so happy to look at :-)


For my version of this Christmas classic, I used a base of Liquid Sky Lacquer in Sleigh Me. I bought a few holiday holos from LSL and I am very pleased! I used three thin coats and wore just the red holo for a day with a nice thick, shiny topcoat. I find that planning like this makes a nice dry base so I don't get smushing when I stamp. Plus when I inevitably mess up a nail (or two or three) I can swipe off my stamping mishap with a cotton ball without eating into my base color up to two times.


For my stamping I used the sweater pattern on Nailz Craze NC03 and Konad special white stamping polish. Nailz Craze is a really nice indie plate maker, I mean, look how crisp the pattern came out! I have used so much of my expensive Konad, but the white stamping polish is so nice and I don't know of any other good ones--feel free to leave me your recommendation!


Of course I topped this with Glisten & Glow's HK Girl. If you don't own this put it on your Christmas list STAT. I can mess around entirely too much with this topcoat and still not smear my art, love!

As with many of my posts, I want to remind everyone that nail art should be fun, not perfection. I try to plan my art so that it doesn't have to perfectly match on each nail, because, in the words of the infamous Sweet Brown, "Ain't nobody got time for that!" Still working on some tutorials... I am a serious under-estimator of how much time my life takes hehe.

Where to find selected products from this post:
Nailz Craze
Liquid Sky Lacquer
Glisten & Glow

Remember to love your cuticles! You always have time for that.

Wednesday, December 11, 2013

Zoya Posh & Savita with Hex Nail Jewelry

Short on time so I'll get right to some pictures! Here are a few swatches of the other Zoya Matte Velvets that I purchased in the trio--they came in the lovely Zoya trio box, too! I highly recommend Zoya Get Even ridge-filling basecoat for a smooth finish.

Zoya Posh
Beautiful berry matte shimmer
Pegasus charm from Hex Nail Jewelry


Zoya Posh with topcoat
 
Zoya Savita
Deep royal purple matte shimmer
Horseshoe charm from Hex Nail Jewelry


Zoya Savita with topcoat


Links for selected products:
Hex Nail Jewelry
Zoya Nail Polish

Remember to moisturize! I'm loving my cuticles several times a day right now. Ugh, winter.

Tuesday, December 10, 2013

Zoya Veruschka with Hex Nail Jewelry


Zoya recently re-released some of their Matte Velvet shades. I don't remember if I saw it on a blog or on Zoy'as facebook, all I know is as soon as I found out I was buying all four shades 10 seconds later. I have been dying for Veruschka for so long and now she is mine! I will be showing you two other shades tomorrow, Veruschka needed her own post.

Zoya Veruschka is a perfect hunter green matte suede. Please excuse the lobster hands, you know what greens do to hands in photos!


I used a nice thick basecoat, Zoya Get Even ridge-filling basecoat. For mattes and suedes this is definitely a must for a flawless finish since you can't use a topcoat to smooth it out. I have also found Zoya works best for me when I use only their basecoats and topcoats with their polish.


While Veruschka was perfectly beautiful, I just got a second order of Hex Nail Jewelry and really wanted to play with them so I added Hex's "Christmas Tree." I have several Hex charms now and I am so pleased with the quality and detail. I anchor mine on with nail glue and for extra staying power, if needed, you can put a topcoat on as well. Obviously I did not use topcoat here, just dabbed on some nail glue with a toothpick and placed it with tweezers.

 
Here is Veruschka with topcoat. You can really see how much shimmer is in the formula to give it depth whether matte or shiny.


 I wanted to lick my nails, they just looked so damn perfect. I love this for a winter or holiday manicure, understated but so chic!


The Matte Velvets are sold out, did anyone else grab some?
Have you tried Hex yet?

Links for selected products:
Hex Nail Jewelry
Zoya Nail Polish

I hope you've shown your cuticles some love today!

Sunday, December 8, 2013

Warm Winter Flakes

Hello out there! I apologize for my absence this past week, sometimes life just gets in the way. Anyway I have a bunch of things lined up for this week, I promise.

I thought it was about time I got some winter going (it's snowed quite a few times in my neck of the woods already). I had on Essie Warm & Toasty Turtleneck from this year's Winter collection, which is very work appropriate but still fun. I decided to stamp it with snowflakes even though my first impulse is to only make blue and white flakes.... I like the snowflakes over the warmer color very much though!


I did the snowflakes using Vivid Lacquer 006. I was initially having some problems getting the image to transfer onto my stamping. Usually I dab a line of polish on one side of the image and then scrap it across to fill in the design. After some experimentation I realized I had to dab the polish over the whole image and then scrape--this made sure all the fine lines were filled in. No problems after that!


I topped this mani with INM Northern Lights. Here's where I messed up... WHY did I not seal the image with HK Girl?! I know I mess around with my polish too much and INM was just a nail art-smudging nightmare. I messed up my ring finger the worst. So after a little swearing, I decided to leave it. I try to balance my inner perfectionist and not let it suck all the fun out of nails.


Purple flakes, yay or nay?
My cuticles are looking less than stellar after a week at work which is dry dry dry. Remember to moisturize!

Monday, December 2, 2013

Brocade Nails featuring ILNP Bottle Service & Mentality Dapper

Short on time right now, so on to the polish!

I Love Nail Polish Bottle Service
Holo chrome with pale golden and silver shift.
I have nothing like it and wasn't sure at first, but I found myself looking at it all day!


Inspired by the pale gold I sometimes saw in Bottle Service, I decided to stamp a brocade design with Vivid Lacquer plate 020 with Mentality Dapper. I can't even think of how to describe Dapper so here is Mentality's description: "Dapper is a metallic nude duocrome holographic nail polish with gold tones and red flash."

For the accent nail I used Orly Halo. Looking back on it I should have done all of the nails with the stamp, live and learn!

I topped it all off with Glisten & Glow's HK Girl Topcoat--my go-to for topping nail art and holos alike! Sorry I've only got the one photo of the stamping. Trying to capture it well enough on camera made all my pictures have weird tones that I am just not smart enough to adjust, haha.

You can purchase the following products from their websites:
Glisten & Glow
I Love Nail Polish
Mentality Nail Polish
Vivid Lacquer

What do you think about the brocade stamping? Do you ever wish you had done a mani slightly differently?
Moisturize those cuticles!
 
Blogging tips