Showing posts with label Essie. Show all posts

Saturday, July 4, 2015

Stamping Saturday: Independence Day Nails

Purchased By Shelby Lou 

Happy Independence Day to all my fellow US readers out there! I absolutely love patriotic manis and nail polishes, so for today I knew I just needed to go over the top and do a skittle mani.

Index (and thumb, not shown): Pretty & Polished Wham Bam Thank Ya Sam
Middle: SquareHue Times Square with Painted Polish Life, Liberty, & The Pursuit of Holo
Ring: Essie Butler Please stamped with Vivid Lacquer 002 and Pure Ice Silver Star
Pinky: What's Your Point-settia? stamped with MoYou London Pro XL 01 and Rica Whiteout, along with silver stud accents

Shelby Lou Nails
Stamping Saturday
Independence Day Mani

Shelby Lou Nails
Stamping Saturday
Independence Day Mani

Tonight my husband and I are going to try and check out some local fireworks! We both have to work Sunday so I hope the ones we plan on going to don't go too late. What are your fun plans for the Fourth of July this year?

***Bonus Stamping Saturday Mani*** 

Earlier this week I shared Hare Polish I'm Your National Anthem. I popped off the studs and stamped it with Vivid Lacquer 015 and a Sinful Colors gold metallic polish. I wish I had done that in the first place, I love how the firework stamp looks over the flakes so much! Check out my Hump Day HARE post from earlier this week to see more of this gorgeous Hare Polish, too.

Shelby Lou Nails
Hare Polish I'm Your National Anthem
Vivid Lacquer 015 & Sinful Colors Gold Medal

Have you loved your cuticles today?


Wednesday, June 17, 2015

HPB Presents: A Beachin' Hump Day HARE

Purchased By Shelby Lou 

Today's post is pulling double duty as both my link-up with the Hobby Polish Bloggers and my Hump Day HARE post! I feel like all I'm doing are beachy nails lately. Seriously, I have another post coming up which will prove it later this week. On to today's the nails!

Today's mani was to be beach-themed for the Hobby Polish Bloggers. I can't get enough teal and gold lately either, so I went with Hare Polish Cabin Fever Fenzy, a teal jeally filled with all kinds of metallic flakies and shimmer. I stamped it with MoYou London Sailor 05 and Essie Good As Gold. I love the Essie Mirror Metallics for stamping, I highly recommend grabbing them if you love to stamp.

Shelby Lou Nails
Hobby Polish Bloggers Presents: A Beachin' Hump Day HARE
Hare Polish Cabin Fever Fenzy
MoYou London Sailor 05 & Essie Good As Gold
without flash

Shelby Lou Nails
Hobby Polish Bloggers Presents: A Beachin' Hump Day HARE
Hare Polish Cabin Fever Fenzy
MoYou London Sailor 05 & Essie Good As Gold
with flash

Shelby Lou Nails
Hobby Polish Bloggers Presents: A Beachin' Hump Day HARE
Hare Polish Cabin Fever Fenzy
MoYou London Sailor 05 & Essie Good As Gold
with flash

Gah, Cabin Fever Frenzy is so squishy! I used three coats and resisted adding a fourth since I was stamping it anyway. Make sure you check out the other manis from the Hobby Polish Bloggers for our monthly link-up party!

Have you loved your cuticles today?

Saturday, May 2, 2015

Saturday Stamping: Hidden City Lagoon

Purchased By Shelby Lou 

Oh Em Gee what a week at work. I ended up doing five hours of "unplanned overtime." I'm always torn about overtime. Like, yay OT pay! But also, boo.... more work. It has just been a rough couple of weeks that have left me emotionally exhausted, which also physically exhausts me. I've been painting nails but have had no energy to photograph and share them. Ah well. Here is a mani I did earlier in the week which I saved for today!

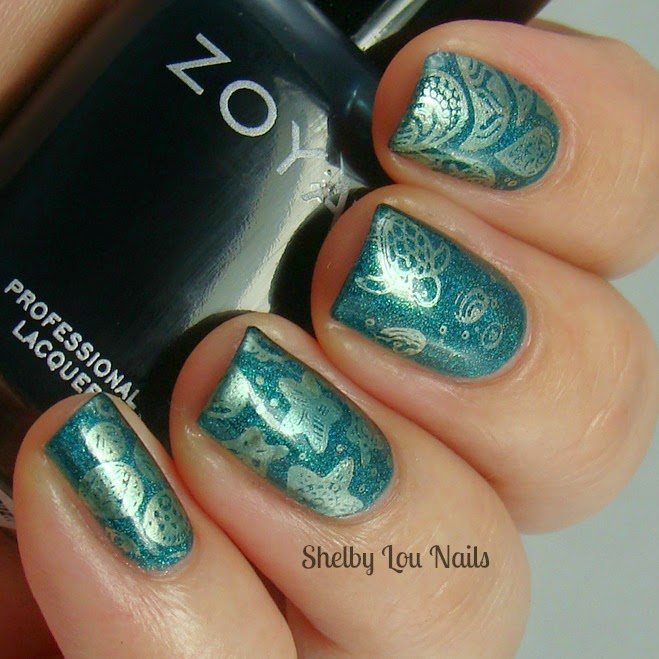
I am calling this look Hidden City Lagoon. I started this mani with a base of Aliquid Lacquer Hidden City--I shared a macro on instagram which you totally need to check out because it is amazeballs. This was my first experience with Aliquid Lacquer. This treasure was sent to me by my buddy Gio from @injeebwetrust. She knows me well! Besides being an amazing deep teal linear holo, it also has copper and gold shimmer. Holoshimms all the way! I apologize for the major lobster hands in my photos, you know I don't do much color editing though. The polish is true!

Shelby Lou Nails
Saturday Stamping
Hidden City Lagoon

After a couple days I decided to stamp it with a new plate I just purchased from MoYou London, Doodles 07. Such an adorable plate! I slapped on some images I liked but took care with my lil turtle, how cute is he?! I used Essie Good As Gold, a fantastic gold metallic stamper.

Shelby Lou Nails
Saturday Stamping
Hidden City Lagoon

I thought I could still further improve this mani and busted out my new Zoya Frida. I purchased the jelly trio from the Zoya Earth Day sale and I am so pleased I did. Just one coat of Frida and I had a lovely little Lagoon.

Shelby Lou Nails
Saturday Stamping
Hidden City Lagoon

I love the process of nail art. What do you think of this week's stamping? Make sure you check out what the other ladies did this week!

Have you loved your cuticles today?


get the InLinkz code

Wednesday, March 11, 2015

Hump Day HARE: Ghostwood National Forest

Purchased By Shelby Lou

I am annoyed by many things this week. I just found out that I need to renew my social worker license before the end of this month--almost a year sooner than I should have to--due to some new changes made by the licensing board. I am beyond annoyed. Not only am I basically get cheated out of money by having to renew sooner (I hate the government), I also have to shell out for a continuing education class. All unplanned expenses this month. Guess I can't buy the new Super Chic Lacquers after all, boo.

And then I got a papercut right by my cuticle on my middle finger swatch-hand. Really?! I covered it up though, I wouldn't subject you guys to that haha.

Today's Hump Day HARE is Ghostwood National Forest, one of the newest additions to the Welcome To Twin Peaks series. I was pretty sure I would dislike this, but it was the only green I had untried of my Hares. Ghostwood is a very dark olive green jelly with gunmetal glitters in dots, hexes, and squares, gold and gunmetal flakes, and purple shimmer.

Shelby Lou Nails
HARE polish Ghostwood National Forest
Accent of Essie Nothing Else Metals
Without Flash

My swatch shows three thin coats. In some lights this polish looks black, in brighter lights it is definitely dark green. The gunmetal dots took on a super-pale lavender hue to me, so I did some edgy triangles with Essie Nothing Else Metals. I used regular old scotch tape for those--much easier than striping tape! I must have been inhaling too many fumes though because I forgot how smooth of a surface one-coat metallics need--oops. It still looks better than those China Glaze Crinkled Chromes though haha!

Shelby Lou Nails
HARE polish Ghostwood National Forest
Accent of Essie Nothing Else Metals
With Flash

You can check out the macro I posted on my instagram to get a better look at all the goodies inside this polish. I like this much more than I thought I would, but it is much darker than anything I've worn in awhile. I'm not pumped about this mani, it leaves me feeling a little meh.

Would you rock this super-dark polish? Do the Crinkled Chromes still give you nightmares? I'm sorry if I retraumatized you.

Products:
Hare Polish

Have you loved your cuticles today?

Tuesday, December 23, 2014

Jindie Nails Christmas Swatch Spam

Press Sample--Jindie Nails Polishes
Purchased by Shelby Lou--All other products

Today's post is brought to you by nubbins. I hate winter because my nails take twice as much care. I tried rounding them out after a couple broken corners, but I hate them round. I know I'm just not used to it and really they looked fine, but I just dislike it on myself. I wish I could rock the short rounds like some of the greats such as The Dalai Hannah, Wondrously Polished, and The Polish Playground!

In case you are not already in the Christmas spirit, here are a bunch of lovely Jindies to help out. Personally, I was in the spirit around November 12th though--don't judge me.

Shelby Lou Nails
Jindie Nails Holly
Shown over China Glaze I Need A Re-Fresh Mint
Above is Jindie Nails Holly over China Glaze I Need A Re-Fresh Mint. This swatch shows one coat with the red glitters fished and dabbed on. Really nice formula for the little glitters and the red ones were easy to get! The white bow I had from Born Pretty Store and used it in almost all of my swatches. You can pick this polish up in Jindie's etsy store.

Shelby Lou Nails
Jindie Nails The Snow Must Go On
This is Jindie Nails The Snow Must Go On, one of my favorite holiday crellies! I love the lime green glitters mixed in and the teeny stars. Lovely formula, I did three thin coats and then dabbed a few stars and red circles where I wanted them. There are plenty of all the glitters so they were easy to grab. This one is available on the Jindie Nails website.

Shelby Lou Nails
Jindie Nails Just Elfing Around
Shown over Essie Borrowed & Blue
Jindie Nails Just Elfing Around is a lovely red, white, and pale green glitter topper. I have it shown over Essie Borrowed & Blue. This is what I think of when I think of Christmas indie polish! Jensent me an 8ml bottle of this but I think I want buy myself a full size. I can see this over pinks and greens, too. I easily painted on the little glitters and dabbed on the bigger ones. You can purchase this one through Jindie's etsy shop.

Shelby Lou Nails
Jindie Nails Through The Eyes Of A Child
Shown over Essie Going Incognito
Jindie Nails Through The Eyes Of A Child is a shimmery Christmas glitter topper that has everything but the kitchen sink. Every shape of Christmas glitter is in there and I don't think you could get them all on your nails in any one mani. I painted on a shimmery coat and then fished and dabbed the other larger shapes. I did three coats of topcoat to get a completely smooth finish. It occurred to me that dabbing the big shapes on first may have decreased how thick this felt on my nails. I have it shown over Essie Going Incognito. Unfortunately I don't see this one in either Jindie shops right now.

Shelby Lou Nails
Jindie Nails A Surprise Inside
Shown over Orly Coachella Dweller
Lastly is A Surprise Inside, one of the Santa's Secret Sack exclusive polishes. I love this one! I have shown one coat over Orly Coachella Dweller, the accent nail has two coats. You could easily wear this in two coats on its own. I found that applying it like one of the Zoya PixieDusts was easiest. I think I love this one because it reminds me of faded vintage ornaments. And the holo glitters aren't too shabby!

You can purchase Jindie Nails polish through her website or etsy store listed below. Check out the other Christmas goodies she has while you are there!

Products:
Jindie Nails
Jindie Nails on Etsy

Have you loved your cuticles today?

Wednesday, December 17, 2014

2014 Edition: Oh, Christmas Tree

Purchased By Shelby Lou 

Today is the last day to enter my Christmas Trio Giveaway! It ends tonight at 11:59pm EST. Don't be a Grinch, make sure you tell a friend ;-)

I know today is normally reserved for HARE, but I just had to share this before it went out of season! Last night I was messing around with my nail vinyls. I redid a few nails after attempting to get those adorable chevron stripes to work on my other hand--I think my nails are too curved or something, I can't get them to stay down and get crisp lines. Anyway I was about to quit nail vinyls forever when I noticed one of my vinyls looked like a skinny Christmas tree... so I made a Christmas tree! I used KBShimmer Vinyl Nail Decals from the Tribal Themed Sheet in the "Connected Triangle Lines" pattern.

Supply List:
Tweezers
Laquerlicious Peppermint Twist
KBShimmer Tribal Themed Vinyl Nail Decal Sheet--"Connected Triangle Lines"
Essie Going Incognito
Jindie Nails The Snow Must Go On--A single teeny red star
a-england Merlin
KBShimmer Clearly On Top

While I wouldn't call this a tutorial, I do have a visual of how I did my little tree. I already had on Laquerlicious Peppermint Twist. I love this polish and it was a great crelly formula! I am so into small glitters lately. Below is a picture showing the placement of the "Connected Triangle Lines," I used tweezers to help place them and then peel them off after I painted Essie Going Incognito in between. I love this color, I am almost halfway through my bottle and that is unheard of in my stash!

Shelby Lou Nails - Oh, Christmas Tree - 2014 Edition

I fished out a teeny red star from Jindie Nails The Snow Must Go On, dabbed it on a piece of paper, then placed it with my trusty tweezers. I dry-brushed on some silver glitter from a-england's Merlin for a little sparkle. I topped everything off with two coats of KBShimmer Clearly On Top, it's my favorite quick-dry TC to use over bumpy glitters.

Shelby Lou Nails - Oh, Christmas Tree - 2014 Edition

Here is the finished mani and how I am going to enjoy it for at least one more day (I just got a bunch of Christmas swatch mail from Jindie Nails, woo!). My favorite part about this tree is I didn't need to fool around with many extra supplies. I am easily frustrated and have no desire to labor for long over nail art. 

Shelby Lou Nails - Oh, Christmas Tree - 2014 Edition

Here is a close-up of my tree. I love it so much! Even my husband was impressed. It's so teeny but the lines are perfect. Ok, maybe I won't be getting rid of my nail vinyls... now who is going to go make a tree? If you try it share a picture with me on facebook!

Shelby Lou Nails - Oh, Christmas Tree - 2014 Edition

Products:
KBShimmer tribal Vinyl Nail Decals
Laquerlicious
Jindie Nails
a-england

Have you loved your cuticles today?

Thursday, May 29, 2014

Neon & Nude Zebra with Zoya Rocha

Hey ladies! Have you ever done a mani and loved it so much when you were done that you screamed? For me, this is one of those manis. I knew I wanted a neon and nude look so I wore Essie Barefoot & Topless for a day. The next night I used Zoya Rocha and stamped my nails with a zebra image from MoYou London Pro Collection XL-04. HOLY AMAZEBALLS. Sorry, I am really not eloquent when I am excited.

Neon & Nude Zebra
Featuring Zoya Rocha & MoYou London

The Tickled cremes are proving excellent stampers! Look how vibrant Rocha is. And the MoYou plate made it effortless. I ordered way too many MoYou plates for my first go, but I have not been disappointed. The images stamp great and are nice and big for my larger and very curved nails. I also used my big squishy stamper from LeaLac and an Elmer's School Glue barrier on my cuticles. I am only just branching out into stamping with colors instead of basic neutral and having so much fun. Would it be wrong to do another neon and nude animal print tonight? Let me know what you think! And please tell me I'm not alone in becoming ridiculously giddy over awesome manis. My poor husband, sometimes I think all he ever sees is me shoving my nails in his face haha!

Products:
MoYou London
Zoya

Have you loved your cuticles today?

Saturday, February 15, 2014

Happy Valentine's... weekend? With Love, Angeline

I am using the weekend for my Valentine's Day manis because I am a failure during the week. What did my husband and I do for Valentine's Day? Ordered in and watched House Of Cards. Anyone a fan here? All I have to say is WTFFF HOUSE OF CARDS.

I digress, on to the polish!

Love, Angeline is a lovely indie polish company that turned just one year old on Valentine's Day. She is having a Birthday-Versary celebration so make sure you check out her facebook page for all kinds of promos. A new blogger collection was just released plus all the classics are available.

Love, Angeline
Pass Me The Sweet Hearts

Here is Love, Angeline Pass Me The Sweet Hearts, a white jelly with pastel glitters and hearts. I did some placing with a couple of the hearts but for the most part this is how it comes out of the bottle. I did a thin basecoat of Essie Marshmallow and two coats PMTSH. Accent nail is OPI Pink Friday with a couple white studs. I topped the whole thing off with two thick coats of KBShimmer Clearly On Top.

Love, Angeline
Pass Me The Sweet Hearts

PMTSH is so delicate and perfect. Love, Angeline's formula is to die for--I've already collected a few of her jellies and I can't get enough. Polish-making is an art and some indies just have it down from the very beginning. I expect big things from Love, Angeline!

Love, Angeline
Pass Me The Sweet Hearts

Products:
Love, Angeline

Have you loved your cuticles today?

Wednesday, February 5, 2014

Polish Addict Nail Color: The Red Queen, The White Queen and Love & Theft

**Samples provided for honest review by Polish Addict Nail Color**

I've got the second half of my Polish Addict review today! I am still so excited to have been able to review such lovely polishes.


Sunday, January 19, 2014

Llarowe's A Box, Indied for January 2013

Since I missed reviewing the December box I wasn't sure how helpful this swatch posts would be for something you can't easily get anymore. However I sort of feel it is my duty to do the swatches for those few that see a bottle on a blog sale and want to know what they look like. I took these pictures on different days a week apart from each other. It's kind of interesting to see how long my nails grow in a week (with filing!) by the end of the post though. Anyway, here are the polishes from Llarowe's A Box, Indied for January 2013.

First up is Freak Show Polish Fire In The Sky. I wasn't thrilled by the last one I tried (Harvest Hayride) so I wasn't sure I'd like this one. It seems like this brand puts bars in everything, too, which you know how I feel about bars. Personal preference aside though it is a pretty nice polish! Glitter spread easily, nice color combination, and the short bars make it more bearable for me personally haha.
Freak Show Polish
Fire In The Sky over OPI Tomorrow Never Dies

Freak Show Polish
Fire In The Sky over OPI Tomorrow Never Dies

Next is Wicked Polish Dropping Balls. Love! I used three thin coats. Tons of glitters in here and nice coverage by the jelly base. And the name is awesome which is always a bonus.

Wicked Polish
Dropping Balls

Wicked Polish
Dropping Balls
Liquid Sky Lacquer New Beginnings might be my favorite from this box. I used three thin coats for this glorious polish. I love the subtle scattered holo, the pale blue, the assortment of glitters... sigh. The perfect winter polish. 

Liquid Sky Lacquer
New Beginnings

Liquid Sky Lacquer
New Beginnings
Dollish Polish Auld Lang Syne is a lovely green-tinted gold metallic holo. I wasn't sure about this one at first as far as being a color I could pull off, but I ended up loving it. Bonus--work appropriate! I used three thin coats. 

Dollish Polish
Auld Lang Syne

Dollish Polish
Auld Lang Syne
Lastly is Different Dimension Frozen Fairy Floss. This is definitely a fish and dab polish... but look how pretty! So delicate and so many awesome glitters including snowflakes. I used Essie Who Is The Boss? for my undies. Love.

Different Dimension
Frozen Fairy Floss

Different Dimension
Frozen Fairy Floss
Overall I feel like this is the first A Box, Indied that blew me away. I am perfectly in love with the polishes and they scream January to me. You can purchase your own box at Llarowe, looks like there might be some left still, too!
Have you loved your cuticles today?

Wednesday, January 1, 2014

Happy New Year! One Last Christmas Mani

I just had to share this last Christmas mani I did. One side of my family gets together after Christmas to celebrate the holiday, this is what I wore this past Sunday. This was done and dry in one hour, not bad! Read on to see my fool-proof formula for skittle manis.

Pinky: OPI Solitaire with one coat topcoat
Ring, Middle, & Thumb: Essie Going Incognito (base color) and I Love Nail Polish Something About Merry
Index: Essie Going Incognito (base color), stamped with Nailz Craze NC 03 (I can't quit the sweater stamp!) and Konad Special White

Christmas Skittles featuring OPI Solitaire, Essie Going Incognito,
I Love Nail Polish Something About Merry, Nailz Craze

ILNP Something About Merry is pretty much my perfect Christmas glitter, I think it's the white satin glitters that do it for me. I like to be inspired by the colors in a glitter for a skittle mani. I knew Something About Merry would be perfect over Going Incognito (have I mentioned you need to own this yet?). Then I took the basic color of the glitter, white, to stamp and use for my texture/glitter pinky.


This formula works really well for me:
(1.) Use your base color on all nails then glitter two or three of them.
(2.) Choose a basic color from the glitter or a complementary basic color to do a glitter pinky and
(3.) stamp one or to accent nails. Basic colors are black, white, silver, gold, and even browns and bronzes in metallic or creme finishes. Texture polishes are my preferred type of pinky accent ;-)

I hope everyone had a lovely holiday!

Products:
ILNP
Nailz Craze

Have you loved your cuticles today? Who is going to take better care of their cuticles this year?

Saturday, December 21, 2013

O, Christmas Tree: Nail Art & Tutorial

Okay, be nice--here is my first tutorial. I whipped this up just to see if I could do it, then it actually turned out alright so I thought I'd post it! I like this nail art because it is quick and easy, but still festive and fun. I've seen these scotch-tape trees around but I had not tried it yet, so I decided to do just one accent nail. I do this for new techniques I want to try so it isn't so overwhelming and I get a result I am really happy with. The last thing I want to do after a long day at work is fight with nail polish, amiright?

First I want to show you my little Christmas Tree. Isn't it cute!


For these nails I used:
Base Color - Liquid Sky Lacquer White Christmas, I used three thin coats for this beautiful silvery white linear holo.
Tree BaseEssie Going Incognito, perfect Christmas emerald green. Seriously you must own this.
Tree GlitterLiquid Sky Lacquer 'Tis The Season, a perfect matte and satin Christmas glitter!
Star Topper - Wet n' Wild Fergie Hollywood Walk of Fame, I let my bottle settle and dumped out half the base. I keep this around for fishing embellishments out of it.

Direct lighting to show off the holo in Liquid Sky Lacquer White Christmas

Click on this image to get a larger visual of the steps, please note I fail as steps 3 and 4 are mixed up...
1.) Paint on your base color for your mani and topcoat (you know I used HK Girl!). For your tree you will need:
--Two pieces scotch tape
--A green creme base for the tree
--A glitter that will fit inside your tree (I avoided the large glitters from Tis The Season)
--A "topper" (you can fish some glitter out of a bottle or use a gleequin, rhinestone, or a stud)
--A scrap piece of paper or foil
--Tweezers to apply topper

2.) Use two piece of tape to create a tall triangle. I placed my tape at the corners of my free edge and had them meet at the top about 1/3 to 1/4 of the way from my cuticle. Tape can be a little too sticky and pull up a fresh base, dab it a few times on your fingers to remedy that. It's not an exact science and if you really want to be on the safe side wear your base for a day.

3-4.) I mixed up steps three and four which I just realized (fml), please forgive me! 
Paint your green creme from the top of your triangle to your free edge in one thick coat, wrap your tip as well. Immediately pull the tape off and stick it to your scrap paper or foil... I'm telling you this step so you don't end up with polished tape and no where safe to set it. Not that that's happened to me a million times... 
In my pictures number 4 shows the first step, number 3 shows what it will look like when you pull the tape off. 

5.) Once your tree is dry, dab on some glitter and push it around to fill the tree in.
6.) Fish for a star (if you are using a shape from a glitter polish) and dab it on a piece of paper. 
7.) Grab the star with your tweezers and place at the top of your tree. 
8.) Time for a nice thick topcoat, I used KBShimmer Clearly On Top.
9.) Enjoy your tree!

Perfectly easy and festive!
I can see doing these in pop colors like pink, green, and white. Or maybe green, blue, and silver! So many possibilities.
What do you think of my first tutorial? I promise I won't rush and mix up my pictures next time haha. Will you be giving this a try?

Selected Products:
Liquid Sky Lacquer

Love your cuticles today!

Sunday, December 8, 2013

Warm Winter Flakes

Hello out there! I apologize for my absence this past week, sometimes life just gets in the way. Anyway I have a bunch of things lined up for this week, I promise.

I thought it was about time I got some winter going (it's snowed quite a few times in my neck of the woods already). I had on Essie Warm & Toasty Turtleneck from this year's Winter collection, which is very work appropriate but still fun. I decided to stamp it with snowflakes even though my first impulse is to only make blue and white flakes.... I like the snowflakes over the warmer color very much though!


I did the snowflakes using Vivid Lacquer 006. I was initially having some problems getting the image to transfer onto my stamping. Usually I dab a line of polish on one side of the image and then scrap it across to fill in the design. After some experimentation I realized I had to dab the polish over the whole image and then scrape--this made sure all the fine lines were filled in. No problems after that!


I topped this mani with INM Northern Lights. Here's where I messed up... WHY did I not seal the image with HK Girl?! I know I mess around with my polish too much and INM was just a nail art-smudging nightmare. I messed up my ring finger the worst. So after a little swearing, I decided to leave it. I try to balance my inner perfectionist and not let it suck all the fun out of nails.


Purple flakes, yay or nay?
My cuticles are looking less than stellar after a week at work which is dry dry dry. Remember to moisturize!

Sunday, November 17, 2013

Stamping: Old Man Pants

I'm not sure, but this could be a total fail here gals.... all I can think of is Old Man Pants. I'm pretty sure my Uncle Butch had a pair of pants in this color and pattern. My husband was also oddly fond of buying plaid old man pants from thrift stores when we were in college and he might have had a pair in brown with pale blue stripes.

Anyway, I just received Essie Parka Perfect from the Winter 2013: Shearling Darling collection. Such a pretty yet understated blue, love! I think it is more gray in real life than it is showing in my photos, but screen settings differ so much I try not to mess with the colors.
After a day of wear I decided to do some stamping and thought about snowflakes or polka dots, something wintery, right? Well then I saw Vivid Lacquer plate 001 and Mentality Prim in my stamping box... this is what happened:


Mentality Prim is a beautiful deep brown stamping holo from Mentality. I don't know how Mentality stays in business because their polishes are such high quality and yet inexpensive! Their stampers are unique, beautiful, and flawless.


As I am sure you remember, Vivid Lacquer makes my favorite stamping plates ever. I found for this image it helped to brush the polish on up and down then left to right to fill in the lines.


I'd really like to point out that this stamping is NOT perfect. I fudged camera angles to make my lines look more straight than they really are. This is my first attempt at straight line stamping--it's hard. But is it good enough to enjoy? Hell yes! Not every mani has to be perfectly executed to be fun. I think it's easy for us nailphiles to look at the top bloggers and feel nail envy (Will Paint Nails For Food--I'm looking at you!). Get inspired by them but have fun, don't be afraid to experiment, and when you have a total fail just take it off and slap on a holo :-)


You can purchase Vivid Lacquer here.
You can purchase Mentality Nail Polish here.
Essie is available just about anywhere and winter polishes are available now.

Any questions, comments, rude remarks about my old man pants?
Remember, moisturized cuticles make any skill level look lovely :-)

Tuesday, October 22, 2013

Twenty Minute Skittlette: Pure Ice Touch Me Softly & Essie Beyond Cozy

I had a wedding to go to this past Saturday. My nails and hands were in rough shape, so I decided to do a treatment Friday night (I used Sunny's Hand Cream from 365 Days Of Color and cotton gloves--works like a charm!). This meant I needed to do my nails Saturday and  fast.

I decided to use a suede which was pretty much a perfect match for my dress, Pure Ice Touch Me Softly. This one was part of the Velour line which came out this past holiday. I have several of the Velours and they are amazing! They were LE, but I hope they'll come out with more or you can snatch some up if you see them on a blog sale. I love a suede when I'm in a hurry--it dries fast and looks so sophisticated. They are also very easy to control and result in minimal clean-up.


I also used Essie Beyond Cozy for some accents. I was going for a quick gradient on the index finger but of course Beyond Cozy was too dense, so I had to kind of work it in. It looks a little crackle-y (which I kind of hate) but overall it was okay.
Then stuck a big ol' gold heart on my ring finger with nail glue. Hey, if you can't wear a giant heart to a wedding then when can you?
I took these photos after I got home and they held up really well! Every time I wear a suede I want to buy more suedes. It's sick.

Do you have a go-to quick cover mani?
Remember that moisturized hands and cuticles make the perfect canvas for your polish :-)
 
Blogging tips